Changing Settings
TrainEasy comes with a lot of configuration options that enable you setup the application to suit your needs. To access the configuration page, login to the backend and go to 'Settings'-'Site Settings'
The configuration page is as shown below:
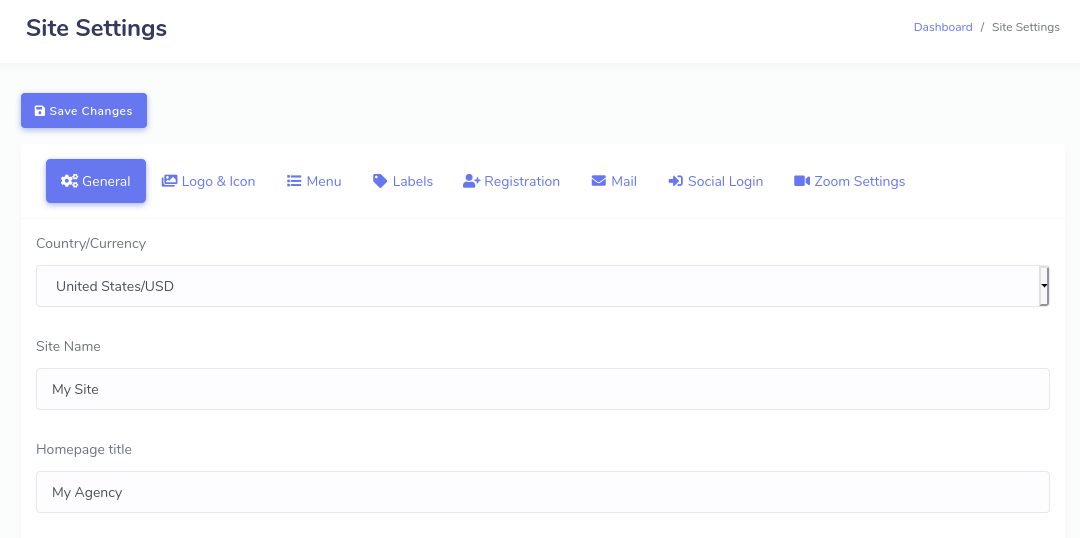
The following section explains the various configuration options
- General Tab
- Country/Currency: This controls the currency that is used for your website. Session fees will be formated based on this setting and payment gateways will also be configured based on this
- Site Name: The site name should be the name of your organization. When the systems sends out email,it will use this as the sender name
- Homepage Title: This is the text that will appear at the top of the browser for the homepage. It is very important for search engine optimization
- Homepage Meta Description: This text is used by search engines and othe robots to get a description about your website. It is important you set this for search engine optimization purposes
- Admin Email: This is the email address that the system will use as the 'from' email when sending out notifications and alerts to students and administrators
- Use SSL: Set this to Yes if you have SSL installed on your server. This enables the app to use https:// for all pages
- Header Scripts (advanced): This can be used to add code (css or javascript) to the HEAD section of all pages of your site (Frontend only).
- Footer Scripts (advanced): This can be used to add code before the closing BODY tag of all pages of the Frontend
- Disqus Shortname: This is used to enable commenting on the Frontend. Visit disqus.com and get your shortname. Once you save it here, commenting will be enabled on the blog and revision notes sections of the Frontend
- Discussion Instructions: This controls the instructions students see when they try to post a question using the discussion feature.
- Show Session Fees: This can be used to hide or show the Fee column on the session enrollment page of the Frontend
- Site IP Address: Here you can specify the IP address of your server. If this is done, it will add extra secuirity to your cron jobs i.e. the automatic reminder emails sent to students and instructors. It ensures that the cron job can only be triggered by your server
- Send Class Reminders: This controls if the system should send reminders to students and instructors about upcoming classes. Please note however that you still need to setup the cron job for this to work. See the 'Setting Up Reminders' section for more information
- Reminder Day: This specifies how many days to a class should reminders be sent. The system will send out reminders once a day every day before the day the class is scheduled to hold.
- Site Timezone: This sets the timezone used by the entire site and the reminder system.
- Reminder Hour: This specifies the hour of the day when class reminders will be sent out.
- Live Chat Code: In this box, you can paste a live chat embed code from your favorite live chat service. This chat box will only be visible when students are taking online courses for which live chat has been enabled.
- Contact Address: The contact address that will be displayed on your 'Contact Us' page
- Contact Telephone No: The telephone number displayed on the 'Contact Us' page
- Contact Email: The email address displayed on the 'Contact Us' page
-
Video Max Size: The maximum size of videos (in megabytes) that can be uploaded. Please note that you PHP max_post_size value must be equal to or greater than this value for this to have any effect.
- Logo and Icon Tab: Upload your website's logo and Favicon here.
-
Menu Tab: Use this to hide or show various elements of the menu and header on the student's dashboard
- Labels Tab: This section allows you to change the default text that is used in the general layout of the student's dashboard.
-
Registration Tab:
- Enable registration?: Enables or disables the student registration form on the frontend
- Registration Instructions: Sets the text displayedat the top of the student registration form on the Frontend
- Successful Registration Email: Controls the text that is sent to a student after they register successfully.
- Send alert for enrollments: This setting enables the adminstrators to get a notification email when a studetn successfully enrolls for a session. For paid sessions, the alert will only be sent after successfull payment.
- Send alert for registrations: This setting enables the administrators to get notified whenever a student fills the registration form successfully.
- Confirm Student Emails: This controls if students will need to confirm their emails after registration.
- Captcha Type: Select the type of Captcha that will be used for the registration and contact forms. We recommend Google reCaptcha v3.
- Recaptcha Site Key: Set this if you selected 'Google reCaptcha' above.
- Recaptcha Secret Key: Set this if you selected 'Google reCaptcha' above
-
Successful enrollment email: Email message sent to the student after enrolling into a course/session.
- Mail Tab: This setting allows you to use an smtp server if you have one. Otherwise, you can use the default which is PHP's native mail function.
- Social Login Tab: Set details for social login.
-
Zoom Settings Tab: Set your Zoom API credentials here